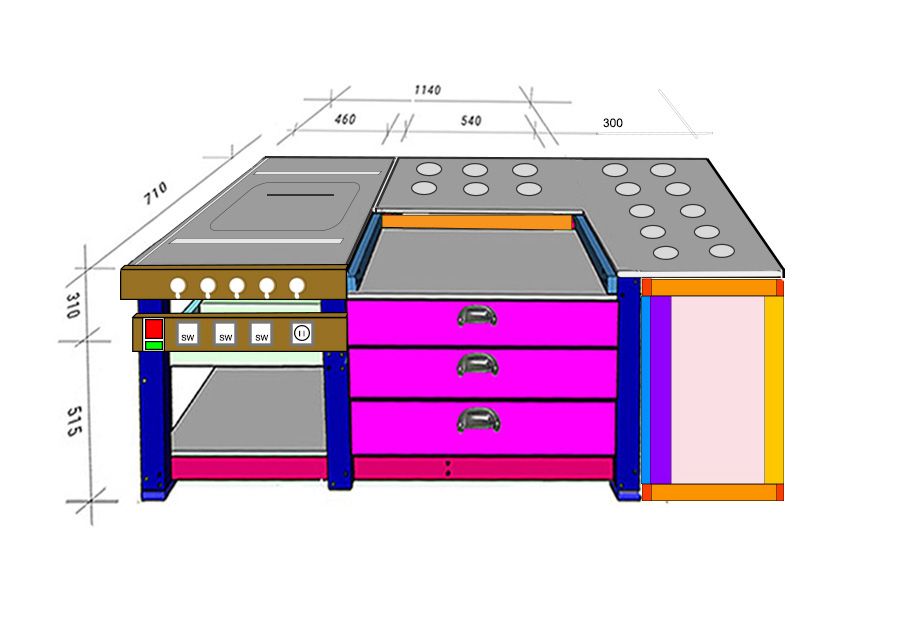
New workbench

No Slides Entered.

NEW WORKBENCH

Illustration of new bench

Second time lucky ?

I built a workbench when we first moved back to Kambia and it was designed for all my machine tools and was easily adaptable. It could be pushed into the attached storage and was easily maneuverable.

Unfortunately I wasn't keeping an eye on the horizon as a new timber storage needed to be built because my wife needed more room in the store room attached to the house. I didn't mind moving because that storage building was illegal as it had not been included on the certified plans and if we moved anywhere, the store would need demolishing and it would take a lot of work to remove the tools.
The workbench was too big in every way for the new store, so I needed to design a new bench. Another one to adapt to the smaller space, but still able to support all my tools and work space.

The adjacent design is being built with adjustments. No slot to the top removeable shelf and now six drawers to each cabinet. The main feature is that it can be easily taken apart to become two tool cabinets nestled side by side in the new store.

I had originally planned to manufacture the whole bench from 12.7mm plywood but I live on the Greek island of Crete and plywood is an horrendous price. I had some 25 x 75mm planed to 22 x 70mm, which was supposed to be used for a garden wind break, so I decided to glue two pieces together, which I hoped would deter the bending. It did to a point, but it needed a lot of clamping overnight to a true surface. I machined the ends to leave like a tenon on each end to ensure the whole cabinet was glued in every direction. This tended to make the cabinets very heavy but I thought this may be a good thing when fitting the machinery.
The facing corners were machined out for the supports and bench panels to exact dimensions for the bench saw and mitre saw.

plywood cutting sheet skeletal work bench

Ready for the drawers. Decided to fix the castors. My initial plan to glue 8mm inserts and then screw the castors into them proved a poor solution but a good one was in easy reach. Amazon supplied the necessary corner brackets with 8mm drilled and tapped holes.

Getting close to the end now. Below is the cutting list and setting out for the side rail runners. Important that the 10mm plywood must be square cut, especially the edge carrying the drawer.

setting out for the runners

On thing that I found with my old bench was the difficulty in clamping on the edge of the bench. It never seemed very satisfactory and I don't like overhangs as this restricts the use of fences.

Browsing Pinterest as one does, I came across this great idea below.

side clamp board

I'd struggled with how to attach the bench saw support and top and make the whole thing stable but easily dismantled and put together without any undue strain on the fixing holes as it was likely to be dismantled at least 4 or five times a year. Eventually I came up with using threaded inserts and bolts. See diagram.

Then my next dilemma. Should I leave the top metal plate of the bench saw and cut the top plywood around it or remove the metal plate and set a kerf through the plywood. This would all depend on how far the rise and fall of the blade was. Time for an experiment.

I had the same philosophy with the top and bottom rails which were formed from two 22 x 70mm machined to 65mm glued together and ends machined to form the design corners for total stability.

corner details of new bench plywood cutting sheet 2

After I had completed the skeletal cabinets, I glued the side and back 12.7mm plywood to be ready for the drawers. I was looking to keep costs low so I decided to use 10mm plywood side rails rather than buy drawer runners, which would have totalled the budget.
Below is the cutting list for most of the drawer elements from 12.7mm plywood. This was three sheets but I still needed another two sheets.
The bench saw blade was nearing its end after all this plywood cutting and this was another unforeseen cost.

drawers cutting list 2 bolt and dogs holes and ply support image

I already had some plastic dogs and aluminium insert rails so all I needed to complete the project was:

4 No 8 x 125mm hex head bolts
4 No 8 x 132 or 150mm hex head bolts
6 No 8 x 40mm c/sink bolts
6 No 8mm c/sink inserts
10 No 8mm inserts
24 No 8mm washers

cost for these €12.64

2 pcs 1200 x 1000 x 20mm plywood
1 pc 1200 x 600 x 10mm plywood.

cost for this ply €94.10

need to add cost of plywood, castors and glue.